Being a Blender noob I find working work weights/vertex groups/armatures confusing as heck. Every time I import a Mixamo animation, I usually need to adjust the weights in Blender to fix up the animation. This is to serve as a quick reference on this workflow.
Note: I’m still figuring this out so I don’t recommend taking this stuff as gospel. If you want to learn more, I suggest reading the docs here and here
Vertex Groups
When working with Armatures I think of Vertex Groups as a way to map vertices to the Armature bones. A Vertex Group is a reference to a selection of Vertices with Weights.
In a Vertex Group the weight defines the influence of each vertex in the group. For example a vertex with 100% weight in the group will have 100% influence on the Armature.
To see visually what vertices are in a vertex group, go to edit mode > select the object > click the vertex property tab > select the vertex group and click “Select”.

Vertex Group mappings
As far as I understand it, a vertex group is mapped to a bone for which it is named after. So for example, mixamorig:Spine2 bone should influence the vertex group with the
same name. So you need to make sure that the vertices in the respective group are properly assigned for the matching bone.
To do this first, select the Armature, go to Pose Mode then select the bone using LMB

Then, ctrl+tab and it should switch to Object Mode. Or click the top left dropdown and select Object Mode. Then select the mesh by clicking shift + LMB:

Then go in to weight paint (ctrl + tab), you should see something like the following:

Notice that the associated vertex group on the right is selected. I have also selected Vertex Selection on the top left, as I find it easier to work with.
Note: I find turning x-ray off helps select the meshes after selecting the bones. Enabling wire edges (top right) also helps with visualizing weights if you’re into that.
If you’re in Vertex Selection mode, you have to select the vertices to paint the weights on them. I just press A to select all and paint. “Painting” weights essentially
does one of two things 1) Add new vertices to the group 2) adjust weights on existing/new vertices in the group. Weights will dictate how much the corresponding bones
will influence these vertices when moving.
Tip: if you turn off Paint Mask and Vertex Selection you can select different bones

Enabling Viewport shading (top right) will also allow you to see the bones make it easier to select them:
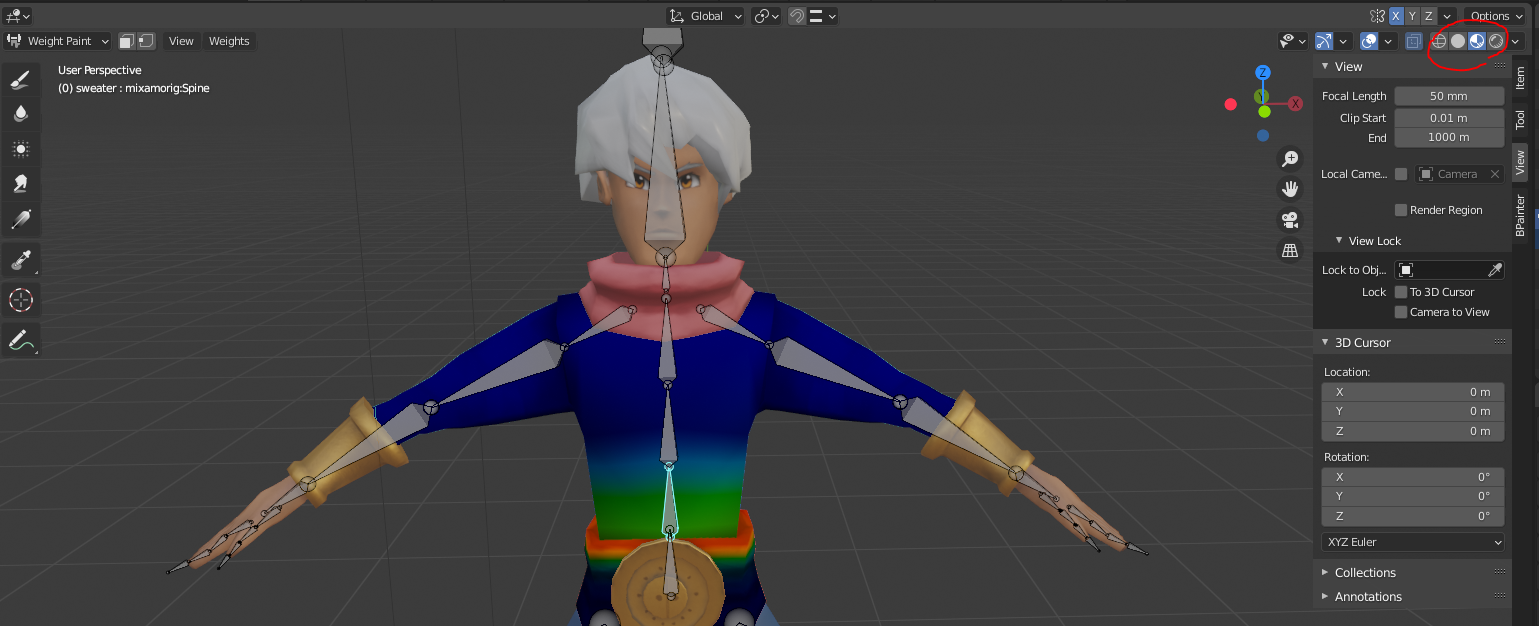
Now try clicking one of the bones , for example if we click mixamorig:Spine we see that it corresponds to the mixamorig:Spine vertex group. If we were to paint other vertices using weight paint while having this bone selected, then we’d essentially be extending the set vertices in this corresponding group along with their relevant weights. This then translates to, “the vertices affected by this bone’s movement, and by how much”.